First-Person Shooter: Player's camera
This is Elympics First-Person Shooter tutorial: part 3. In this part we’ll be creating separate camera for each player. See: Part 2.
Assigning a camera to the player
Currently, each player uses the same camera that watches the entire scene from above. However, in FPS games, each player should have a distinct camera assigned to their character (player prefab).
To fix it, you’ll need to remove the current camera from the scene and, then, edit the Player0 prefab.
To do this, create a new Empty Game Object within and set its name to FirstPersonViewController: this object will be the main container for your camera, weapons held by the player, etc. Set its position to 0, 1.75, 0 so that the height of the object corresponds to where the player's camera should be. Then, add ElympicsBehaviour with Predictable For settings appropriate for the player it belongs to and with transform synchronization to it. Now, other players will be able to see the direction in which you’re looking when you’re moving the camera.
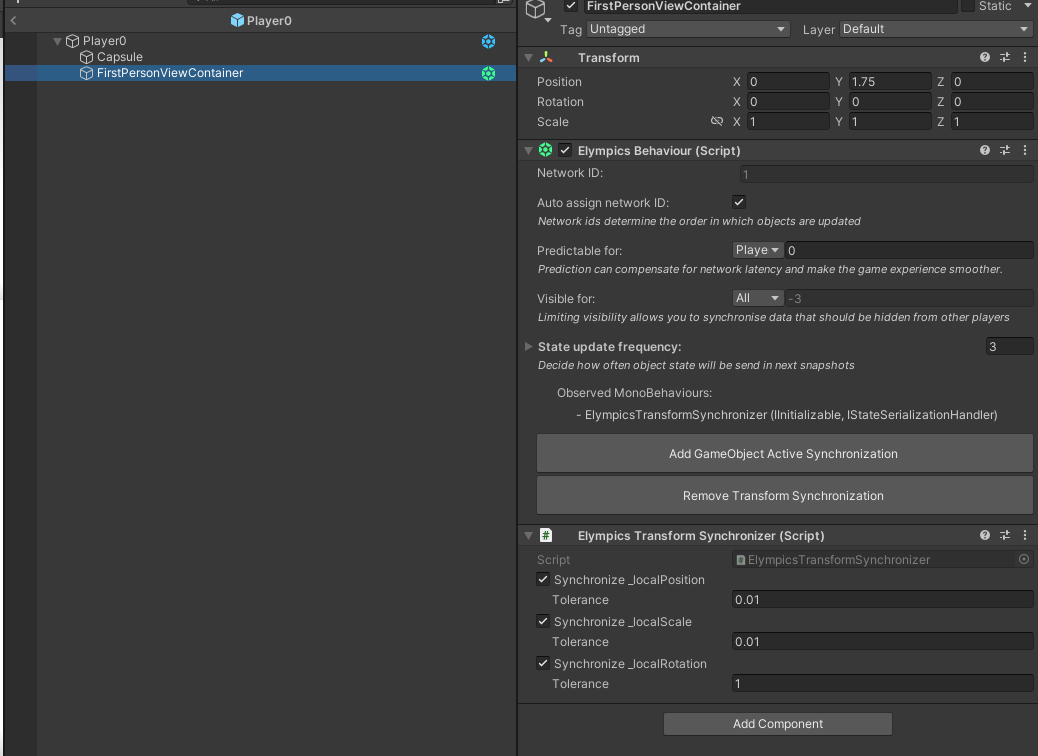
The next step is to add a camera object as a child of the container you’ve just created. The default settings are sufficient for the needs of our guide, but feel free to modify them as you want.
Each player already has their own camera. All we have to do now is to turn off all the cameras of the players who are not our characters at the start of the game. To do this, you’ll need to create a new CameraInitailizer.cs script:
[RequireComponent(typeof(PlayerData))]
public class CameraInitializer : ElympicsMonoBehaviour, IInitializable
{
    public void Initialize()
    {
        var playerData = GetComponent<PlayerData>();

        InitializeCameras(playerData);
    }

    private void InitializeCameras(PlayerData playerData)
    {
        var camerasInChildren = GetComponentsInChildren<Camera>();

        bool enableCamera = false;

        if (Elympics.IsClient)
            enableCamera = (int)Elympics.Player == playerData.PlayerId;
        else if (Elympics.IsServer)
            enableCamera = playerData.PlayerId == 0;

        foreach (Camera camera in camerasInChildren)
        {
            camera.enabled = enableCamera;

            if (camera.TryGetComponent<AudioListener>(out AudioListener audioListener))
            {
                Destroy(audioListener);
            }
        }
    }
}
This script works as follows: The
Elympics Initialize()method ensures that the entire Elympics system is ready to be used. In this method, you’re getting thePlayerDatacomponent thanks to which you’re able to find out whatPlayer Idthe given player object has assigned to it. Then, you call theInitializeCamerasmethod that collects all the cameras assigned to your player object (in case you’d like to create more than one camera, e.g. for rendering the player's hands separately) and manages them accordingly.
Now, check whether you’re a game client or a server. If you’re a client, compare whether the given player's prefab (their PlayerId) corresponds to the id of your client. If so, the cameras for the given object will remain unchanged, and if not, you’ll need to turn them off.
You may also check whether you’re a server so that you’ll have a preview of the game on the server side from the player 0 perspective when testing the game in the Half Remote mode.
Add the above script to the parent object of the player prefab. From now on, each player will be able to observe the game fully independently by using their own camera!
Player 1 is moving on the scene (View for Player 0)
Controlling the player’s camera
Each player already has an individual camera assigned. The next step is to allow the player to look around the scene and rotate the character.
Controlling the camera will be done with the mouse, so once again we will start our work with the InputProvider script:
public class InputProvider : MonoBehaviour
{
    [SerializeField] private float mouseSensivity = 1.5f;
    [SerializeField] private Vector2 verticalAngleLimits = Vector2.zero;
    [SerializeField] private bool invertedMouseXAxis = false;
    [SerializeField] private bool invertedMouseYAxis = false;

    private Vector2 movement = Vector2.zero;
    public Vector2 Movement => movement;

    private Vector3 mouseAxis = Vector3.zero;
    public Vector3 MouseAxis => mouseAxis;

    public bool Jump { get; private set; }

    private void Update()
    {
        movement.x = Input.GetAxis("Horizontal");
        movement.y = Input.GetAxis("Vertical");

        var mouseX = Input.GetAxis("Mouse X") * (invertedMouseXAxis ? -1 : 1);
        var mouseY = Input.GetAxis("Mouse Y") * (invertedMouseYAxis ? -1 : 1);
        var newMouseAngles = mouseAxis + new Vector3(mouseY, mouseX) * mouseSensivity;
        mouseAxis = FixTooLargeMouseAngles(newMouseAngles);

        Jump = Input.GetButton("Jump");
    }

    private Vector3 FixTooLargeMouseAngles(Vector3 mouseAngles)
    {
        mouseAngles.x = Mathf.Clamp(mouseAngles.x, verticalAngleLimits.x, verticalAngleLimits.y);

        return mouseAngles;
    }
}
There are new variables responsible for mouse sensitivity, angle limits and flags used to recognize whether the loaded values are to be inverted. The MouseAxis variable will be used to obtain the value of the mouse by the InputController.
The script will read the mouse movement values frame by frame, modifying them with sensitivity value, and, finally, modifying the up-down viewing angles if they turn out to be too large.
There won’t be many changes in InputController.cs, but you’ll have to handle new angle values:
    [...]
    private void SerializeInput(IInputWriter inputWriter)
    {
        inputWriter.Write(inputProvider.Movement.x);
        inputWriter.Write(inputProvider.Movement.y);

        inputWriter.Write(inputProvider.MouseAxis.x);
        inputWriter.Write(inputProvider.MouseAxis.y);
        inputWriter.Write(inputProvider.MouseAxis.z);

        inputWriter.Write(inputProvider.Jump);
    }

    public void ElympicsUpdate()
    {
        var forwardMovement = 0.0f;
        var rightMovement = 0.0f;
        bool jump = false;

        if (ElympicsBehaviour.TryGetInput(ElympicsPlayer.FromIndex(0), out var inputDeserializer))
        {
            inputReader.Read(out forwardMovement);
            inputReader.Read(out rightMovement);

            inputReader.Read(out float xRotation);
            inputReader.Read(out float yRotation);
            inputReader.Read(out float zRotation);

            inputReader.Read(out jump);

            ProcessMovement(forwardMovement, rightMovement, jump);
            ProcessMouse(Quaternion.Euler(new Vector3(xRotation, yRotation, zRotation)));
        }
    }

    private void ProcessMouse(Quaternion mouseRotation)
    {
        viewController.ProcessView(mouseRotation);
    }

    [...]
Just like in the case of moving, you’ll need to write the values using the inputWriter that will be sent to the server later on. Next, read these values and create Quaternion angles from the obtained values and pass them on to the ViewController. It’ll be a new class that will deal with looking around the camera in your project, so you’ll need to create a new script: ViewController.cs:
public class ViewController : MonoBehaviour
{
    [Header("References:")]
    [SerializeField] private Transform verticalRotationTarget = null;
    [SerializeField] private Transform horizontalRotationTarget = null;

    public void ProcessView(Quaternion mouseRotation)
    {
        horizontalRotationTarget.localRotation = Quaternion.Euler(0, mouseRotation.eulerAngles.y, 0);
        verticalRotationTarget.localRotation = Quaternion.Euler(mouseRotation.eulerAngles.x, 0, 0);
    }
}
This script is very short: it contains two references to two different objects. One of them will have the X rotation modified and the other — the Y rotation.
This class will modify the X rotation of the previously created container for first-person objects like the camera or your player’s hands. The Y rotation is the rotation of the entire body of the player's prefab, so the reference for this modification will be the player's root transform game object.
Add the created script to the player's prefab and complete the missing references:
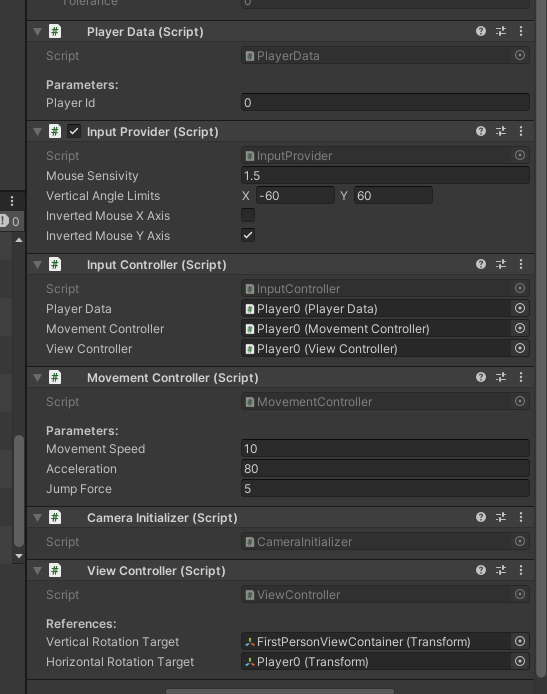
Look around!
From now on, each of the clients can move individually and look around the scene freely. 👀
In the next part we'll be preparing weapon abstract class and loadout controller! 🔫🎒