First-Person Shooter: Player movement
This is Elympics First-Person Shooter tutorial: part 2. In this part we’ll be creating player movement using Elympics. See: Part 1.
Sending input to the server
Start the implementation of your player's movement by creating an InputProvider script. It’ll be responsible for collecting and storing all the inputs entered by the player using a specific controller (in this case: a keyboard and a mouse).
Our goal is to separate the responsibilities of collecting input and sending it to the server into two different scripts, but nothing prevents you from putting all the code in one class.
Let's start by creating a new InputProvider.cs script. It’ll serve as a support for another script that deals with sending input to the server, so begin with creating a special method that enables obtaining data on the player input.
To allow the player to perform the basic X and Z axis movement, your InputProvider class should look like this:
public class InputProvider : MonoBehaviour
{
    private Vector2 movement = Vector2.zero;
    public Vector2 Movement => movement;

    private void Update()
    {
        movement.x = Input.GetAxis("Horizontal");
        movement.y = Input.GetAxis("Vertical");
    }
}
This class focuses only on collecting, remembering and sharing input. This script will be used by another class that already sends input directly to the server. For this, you’ll need to create a new class: InputController.cs.
If you want the player to send the input, this class must change its inheritance from the MonoBehaviour class to the ElympicsMonoBehaviour class which you can find in the Elympics namespace. Additionally, the handling of sending and applying inputs itself requires the implementation of the IInputHandler interface.
using Elympics;

public class InputController : ElympicsMonoBehaviour, IInputHandler
{
    public void OnInputForBot(IInputWriter inputSerializer)
    {

    }

    public void OnInputForClient(IInputWriter inputSerializer)
    {

    }
}
As the created class will be based entirely on the inputs provided by the InputProvider class, you can add the RequireComponent attribute to this class to make sure that the InputProvider won’t be null.
Once you make sure that the InputProvider class exists, you’ll still need to obtain an appropriate reference to it. For this purpose, you’ll need to use the GetComponent method in the Initialize method, the implementation of which requires another Elympics interface: IInitializable. This ensures that you’ll get a reference to the InputProvider class before any other method related to the IInputHandler interface is called.
[RequireComponent(typeof(InputProvider))]
public class InputController : ElympicsMonoBehaviour, IInputHandler, IInitializable
{
    private InputProvider inputProvider = null;

    public void Initialize()
    {
        this.inputProvider = GetComponent<InputProvider>();
    }

    [...]
}
The IInputHandler interface requires the implementation of two methods responsible for sending all the player inputs to the server: OnInputForBot and OnInputForClient. Both of these methods have an argument of the IInputWriter type, which is the key object responsible for all the data sent by players to the server. In this project, you do not provide a separate logic for the operation of bots, so you can create a single, universal method that will deal with saving the appropriate data to the inputSerializer.
Let's create a new SerializeInput method:
    private void SerializeInput(IInputWriter inputWriter)
    {
        inputWriter.Write(inputProvider.Movement.x);
        inputWriter.Write(inputProvider.Movement.y);
    }
Then, call it in the interface methods responsible for sending the input:
    public void OnInputForBot(IInputWriter inputSerializer)
    {
        SerializeInput(inputSerializer);
    }

    public void OnInputForClient(IInputWriter inputSerializer)
    {
        SerializeInput(inputSerializer);
    }
The above code works as follows:
- At the start of the game, the InputController script calls the Initialize method, which will provide a reference to the InputProvider class instance.
- The InputProvider class will save and update frame by frame the state of the input entered by the player.
- During each Elympics tick, the InputController class will execute the OnInputForBot or OnInputForClient method and then the SerializeInput method. This method will retrieve the saved input from InputProvider and pass it to the IInputWriter object, thanks to which the input entered by the player will be sent to the server.
Receiving and applying input
You’ve already handled the basic way of sending the input to the server, but you still need to implement its application. Once the server receives the input from the player, it will make it available through the TryGetInput method of the current ElympicsBehaviour (both on the server side and at the sending client). This method should be called in ElympicsUpdate (which is related to the implementation of another interface: IUpdatable).
The TryGetInput method provides the key object of the
IInputReadertype. It’s important to use it to read all the variables that you’ve saved on the client side and sent to the server, always in the same order!
[RequireComponent(typeof(InputProvider))]
public class InputController : ElympicsMonoBehaviour, IInputHandler, IInitializable, IUpdatable
{
    [...]
    public void ElympicsUpdate()
    {
        var forwardMovement = 0.0f;
        var rightMovement = 0.0f;

        if (ElympicsBehaviour.TryGetInput(ElympicsPlayer.FromIndex(0), out var inputReader))
        {
            inputReader.Read(out forwardMovement);
            inputReader.Read(out rightMovement);
        }
    }
}
Although each player will use this script, the input will serve for a specific player only. That's why you need to know which object is controlled by the given player (the TryGetInput method checks if the received input is intended for the given player). For this purpose, you’ll need to create a PlayerData class that will hold all the data for each player, e.g. Player Id.
public class PlayerData : MonoBehaviour
{
    [Header("Parameters:")]
    [SerializeField] private int playerId = 0;

    public int PlayerId => playerId;
}
All the scripts prepared so far will be added to the player's prefab object. Once you have a class that holds the data about your player, add it to the previously created InputController:
[RequireComponent(typeof(InputProvider))]
public class InputController : ElympicsMonoBehaviour, IInputHandler, IInitializable
{
    [SerializeField] private PlayerData playerData = null;

    private InputProvider inputProvider = null;

    public void Initialize()
    {
    [...]
Now, use the saved connection with the player's ID in the TryGetInput method:
public void ElympicsUpdate()
{
    var forwardMovement = 0.0f;
    var rightMovement = 0.0f;

    if (ElympicsBehaviour.TryGetInput(ElympicsPlayer.FromIndex(playerData.PlayerId), out var inputReader))
    {
        inputReader.Read(out forwardMovement);
        inputReader.Read(out rightMovement);
    }
}
From now on, any code after the written if statement will be executed only for the intended player. It means that you can start implementing subsequent classes that perform a specific logic and behavior of the player!
Player movement
Start with the MovementController class:
[RequireComponent(typeof(Rigidbody))]
public class MovementController : ElympicsMonoBehaviour
{
    [Header("Parameters:")]
    [SerializeField] private float movementSpeed = 0.0f;
    [SerializeField] private float acceleration = 0.0f;

    private new Rigidbody rigidbody = null;

    private bool IsGrounded => Physics.Raycast(transform.position + new Vector3(0, 0.05f, 0), Vector3.down, 0.1f);

    private void Awake()
    {
        rigidbody = GetComponent<Rigidbody>();
    }

    public void ProcessMovement(float forwardMovementValue, float rightMovementValue)
    {
        Vector3 inputVector = new Vector3(forwardMovementValue, 0, rightMovementValue);
        Vector3 movementDirection = inputVector != Vector3.zero ? this.transform.TransformDirection(inputVector.normalized) : Vector3.zero;

        ApplyMovement(movementDirection);
    }

    private void ApplyMovement(Vector3 movementDirection)
    {
        Vector3 defaultVelocity = movementDirection * movementSpeed;
        Vector3 fixedVelocity = Vector3.MoveTowards(rigidbody.velocity, defaultVelocity, Elympics.TickDuration * acceleration);

        rigidbody.velocity = new Vector3(fixedVelocity.x, rigidbody.velocity.y, fixedVelocity.z);
    }
}
In the ProcessMovement method, this class will receive floats determining the player's forward and sideways movement, then determine the correct direction of movement and finally modify the velocity of the rigidbody component (ApplyMovement).
Now, you can add the created MovementController class to your InputController:
[RequireComponent(typeof(InputProvider))]
public class InputController : ElympicsMonoBehaviour, IInputHandler, IInitializable, IUpdatable
{
    [SerializeField] private PlayerData playerData = null;
    [SerializeField] private MovementController movementController = null;

    [...]

    public void ElympicsUpdate()
    {
        var forwardMovement = 0.0f;
        var rightMovement = 0.0f;

        if (ElympicsBehaviour.TryGetInput(ElympicsPlayer.FromIndex(playerData.PlayerId), out var inputDeserializer))
        {
            inputDeserializer.Read(out forwardMovement);
            inputDeserializer.Read(out rightMovement);

            ProcessMovement(forwardMovement, rightMovement);
        }
    }

    private void ProcessMovement(float forwardMovement, float rightMovement)
    {
        movementController.ProcessMovement(forwardMovement, rightMovement);
    }
}
The last step is to prepare the player's prefab properly. Add all the scripts prepared before to the previously created object with the capsule and assign references to it:
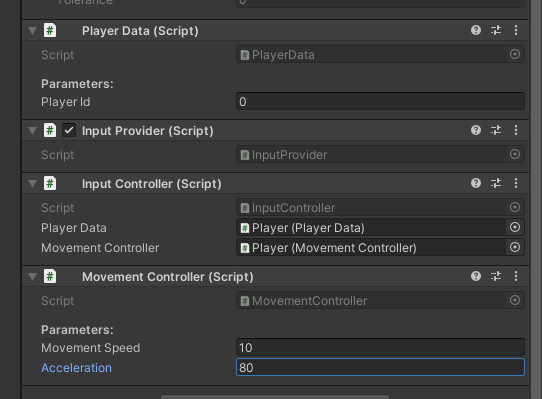
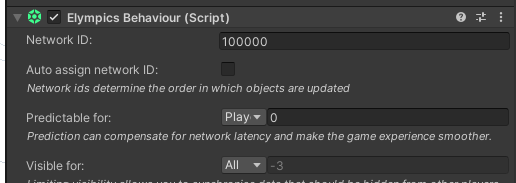
Now, rename the player object to Player0 and create a prefab from this object. Then, change the appropriate values in ElympicsBehaviour by setting the prediction for player 0 and manually assign the NetworkID to make it easier to distinguish between them:
All you need to do now is to duplicate this object in the scene, rename it to Player1, and create a prefab variant from this object:

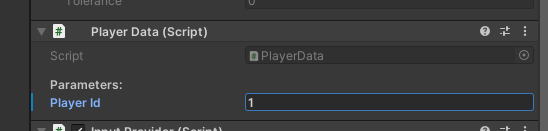
In the second player's prefab (Player1), change the assigned PlayerId in PlayerData to 1:
Also, modify ElympicsBehaviour for the second player:

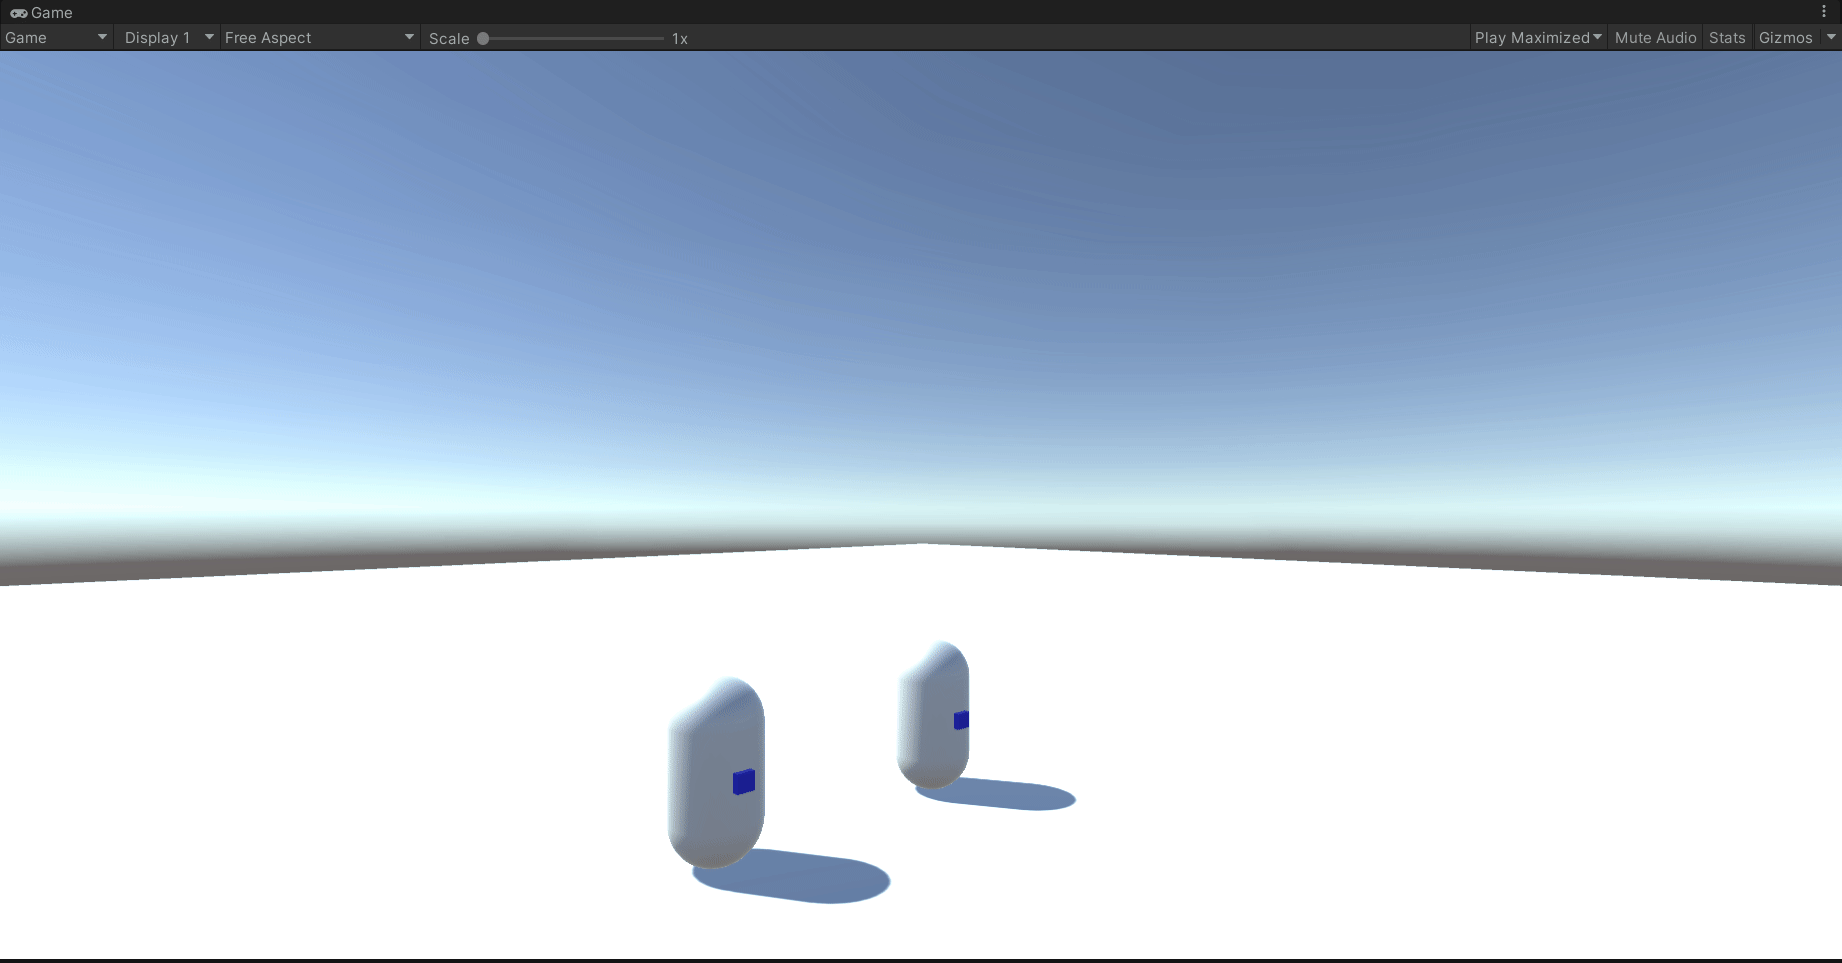
From now on, you’ll be able to move players in the scene in both Local Player and Bots and Half Remote modes!
Running Half-Remote mode is described in the Pong 2D tutorial, part 2.
Jumping
When creating a movement, you cannot forget about the jump. Start adding the jump button once again with InputProvider and allowing InputController to read the value of the jump button:
public class InputProvider : MonoBehaviour
{
    private Vector2 movement = Vector2.zero;
    public Vector2 Movement => movement;

    public bool Jump { get; private set; }

    private void Update()
    {
        movement.x = Input.GetAxis("Horizontal");
        movement.y = Input.GetAxis("Vertical");

        Jump = Input.GetButton("Jump");
    }
}
From now on, InputController will be able to get the Jump value and pass it to the server. Both InputController and MovementController must be updated with an additional variable:
InputController.cs:
    [...]

    private void SerializeInput(IInputWriter inputWriter)
    {
        inputWriter.Write(inputProvider.Movement.x);
        inputWriter.Write(inputProvider.Movement.y);

        inputWriter.Write(inputProvider.Jump);
    }

    public void ElympicsUpdate()
    {
        var forwardMovement = 0.0f;
        var rightMovement = 0.0f;
        bool jump = false;

        if (ElympicsBehaviour.TryGetInput(ElympicsPlayer.FromIndex(0), out var inputDeserializer))
        {
            inputReader.Read(out forwardMovement);
            inputReader.Read(out rightMovement);
            inputReader.Read(out jump);

            ProcessMovement(forwardMovement, rightMovement, jump);
        }
    }


    private void ProcessMovement(float forwardMovement, float rightMovement, bool jump)
    {
        movementController.ProcessMovement(forwardMovement, rightMovement, jump);
    }
}
MovementController.cs:
    [...]
    [SerializeField] private float jumpForce = 0.0f;
    [...]

    public void ProcessMovement(float forwardMovementValue, float rightMovementValue, bool jump)
    {
        Vector3 inputVector = new Vector3(forwardMovementValue, 0, rightMovementValue);
        Vector3 movementDirection = inputVector != Vector3.zero ? this.transform.TransformDirection(inputVector.normalized) : Vector3.zero;

        ApplyMovement(movementDirection);

        if (jump && IsGrounded)
            ApplyJump();
    }

    private void ApplyJump()
    {
        rigidbody.AddForce(Vector3.up * jumpForce, ForceMode.Impulse);
    }
To easily control the jump force from the inspector, add the following variable:
[SerializeField] private float jumpForce = 0.0f;
(set its value to 5.0f in this project)
You can already check if the character is standing on the ground as you have IsGrounded in MovementController.cs.
It's alive!
Now, when the player presses the space bar and stands on the ground, their character will pop up! 🤸♀️
View on server side
In the next part we'll focus on assigning a camera to the player! 👀📽